1.1 There are two types of render;
1.1.1 Standard Cement Render –Sand:Cement:Water mixed on site in a cement mixer measured in an often uncontrolled method using a shovel.
1.1.2 “Bag” Render – which is a factory produced blend of finely graded and washed sand, cement and polymer (acrylic) additives which act as binders and improve the water repellent properties of the render (think of it as a very good Cement render using the best materials and with the added benefit of a flexible waterproofing glue mixed into it). It is supplied in 20kg bags typically.
1.2 It is preferable to use “bag” render wherever possible. We recommend against using Standard Cement render as it is just too inconsistent in its manufacture and is simply not as strong. It also does not have the same water repellent properties and takes longer to cure before painting. Bag render is manufactured with greater quality control and are consistent in strength and quality. Both can contain iron stone which can and often does result in rust stain bleeding through the paint system and leaving unsightly rust stains down the wall. Bagged render is magnetic sieved to reduce the occurrence significantly, but it cannot be 100% eliminated
1.3 “Bag” Render manufacturers include:
• “Q Render” by Rockcote (Short for “Quick Render”)
• “Acratex” by Dulux
• “Quick wall” by Quickfinishes
• “Armawall” by Taubmans
• “Granorender” by Wattyl
1.4 Give the renderer the best opportunity to provide a good quality finish by controlling the preceding structure trades – make sure the block layer produces a plumb wall with consistent flush fitting blocks. You don’t want a 3 storey wall 20mm out of plumb with blocks laid overhanging the adjacent block by 4mm (like it was placed without any care about the next trade) and expect the renderer to “make it look good”. Most block or brick layer take little or no care if the wall is rendered, however the quality of laying in a render wall is just as or more important than a non-rendered wall as the failures of the layer will be highlighted in the smooth rendered and paint finish and will allow water into the walling system.
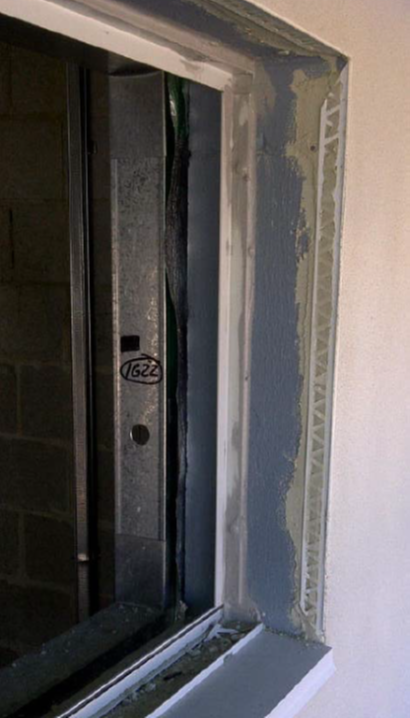
1.5 Make sure waterproofed substrates (like window heads, jambs and sills) have a membrane and render system that is compatible. Generally Acrylic based render requires an acrylic based waterproof membrane. So often the bitumen or polyurethane based waterproof membranes will not be compatible so consult your waterproof manufacturer early.
1.6 Obtain a project specific letter with from the specific manufacturer confirming that the render is compatible with the specified or proposed waterproof membrane. Most manufacturers have a compatibility chart (not provided here – get it for each product as they vary greatly) and may require a special primer to be applied by the renderer to ensure bonding of the render to the membrane.
1.7 Render thickness will not exceed 15mm without mesh reinforcing (mechanical key) being fixed to the wall prior to rendering.
1.8 Surface preparation is vital to achieving a solid bond between the render and substrate. As with concrete finishes, any dags or foreign substances on the masonry may lead to delamination so rub down and clean off block work prior to commencement of render works.
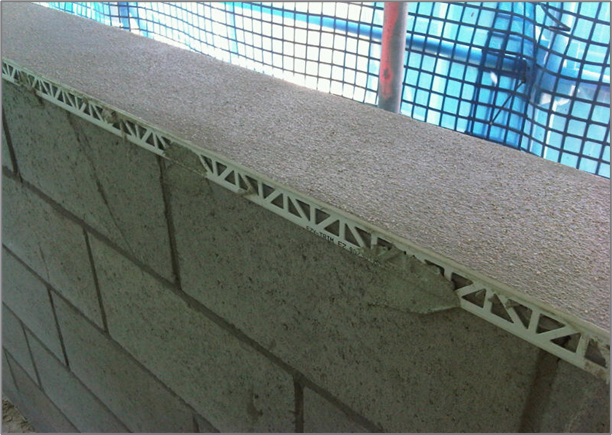
1.9 Use plastic trims (in lieu of steel or just a formed rendered edge) for all external corners and control joints. Metal beads rust and are the cause of major post construction repairs. They are the same as setting beads/ trims for plasterboard. They provide a stronger and straighter corner and joint line. These are fixed to the wall using the bag render then the render is applied over the render trim.
1.10 Use the Plastic control beads/trims as a superior finishing method and prevention against the polyurethane/silicone seal tearing the render apart. The PVC trims are a stronger expansion joint.
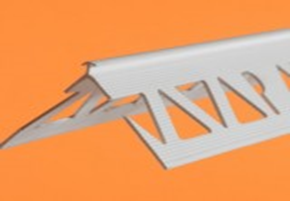
Above - External Corner Angle

Above - Control Joint
1.11 Do not render hard up against window and door frames. A 6mm or greater flexible seal is required around perimeter of openings. Refer to AS2047 where there must be a “V”ed bond breaker / flexible seal applied to the junction between the window frame and render prior to painting.
1.12 After rendering, cavities and weep holes will be checked to ensure they are free of render and able to drain.
1.13 The render will not be painted until the moisture content in the render is no more than 15% as indicated by an electrical resistance test. Alternatively, it must be left to cure for a period of no less than 28 days or the use of an epoxy primer (or similar product) is to be applied to the surface prior to painting if the moisture content exceeds 15%. Discuss this further with the Cement and Concrete Association if necessary,
1.14 Paint “bag” render within the time frame nominated by the manufacturer. Some manufacturers require the render to be painted within a specific timeframe to avoid UV (ultraviolet) degradation (breakdown) of the polymer binders in the render. Obtain and read all installation specification.
1.15 Render will not be sealed with clear external finishes (these are not successfully UV stabilised and breakdown in a short time). Ensure a durable paint system is used. In cases where water entry into the render is likely (such as rendered sills etc) – use an ENVELON or equivalent membrane system colour-matched to the paint system. ENVELON has been used successfully in repairs in many leaks in rendered facades.
1.16 Provide protection over all windows and doors – clean up render droppings daily – refer Protection policy for further details
1.17 Never render/paint a roof/awning. Use external topping compound and UV stabilised waterproof membrane.
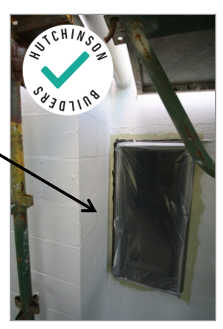
Above - Protection to External Windows during Render works.

Above - Inadequate protection, render droppings over finished surfaces - unacceptable