7.1 The first step in ensuring the expected quality is provided is to determine the EXPECTATION for the required level of finish. In other words, make sure everyone agrees that the works will be of an agreed level of quality viewed in an agreed manner.
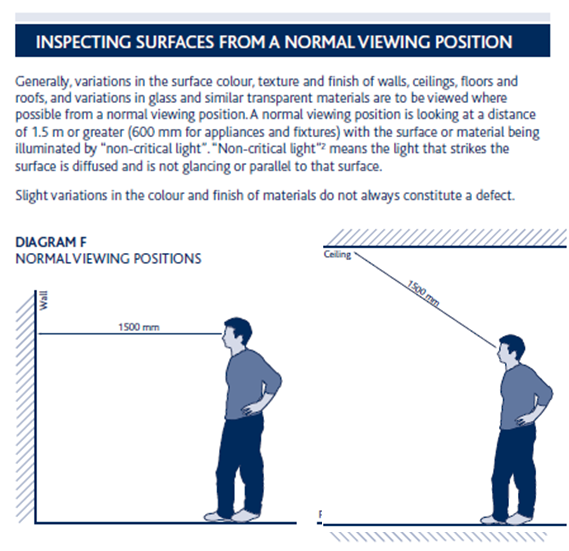
7.2 Perception and expectations play a major factor in the acceptance of finish. What might be acceptable to you may not be acceptable to someone who has invested millions of dollars on their dream house. The official “Guide to tolerances” suggests a practical approach as shown below
7.3 The selection for a level of finish follows loosely the guideline below;
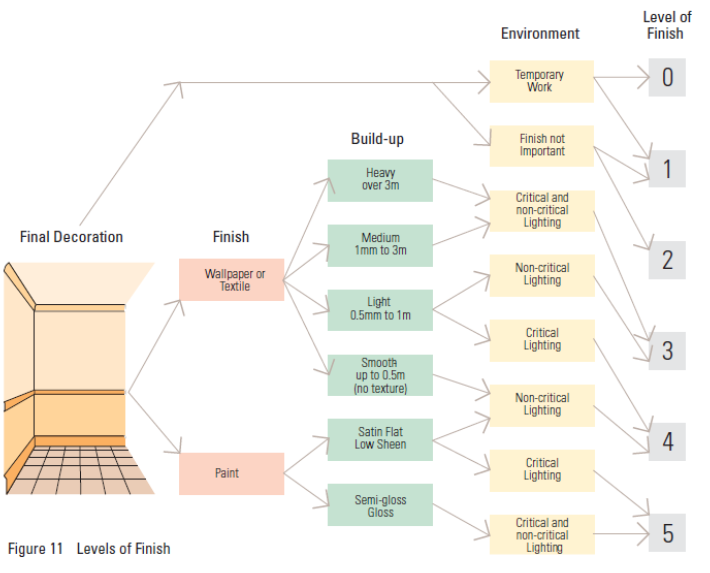

The term 'Level of Finish' refers to the quality of finish required for plasterboard clad walls and ceilings.
There are six levels of Finish (0-5) outlined in the Australian Standard AS/NZS 2589:1:1997 Gypsum Linings in Residential Light Commercial Construction - Application and Finishing. Part 1 Gypsum Plasterboard.
The desired level of Finish should be determined at the design stage as each level is specific:
- Frame tolerance
- Plasterboard fixing and finishing requirements
- Methods of jointing
- Stopping requirements
- Corner / angle accessories
Level 0
This Level may be useful for temporary construction where there is no requirement for stopping, taping, finishing, or accessories. The installation only involves gluing and screwing/nailing plasterboard sheets into place.
Level 1
Used in concealed applications such as plenum areas above ceilings and building service corridors. All joints and interior angles have tape embedded in the joint compound. The surface is to be free of excess joint compound, and tool marks and ridges are generally acceptable.
Level 2
Level 2 is suitable for storage areas where surface appearance is not of primary concern. All joints and interior angles shall have tape embedded in the joint compound. Apply one separate coat of joint compound over all joints and fastener heads. The surface should be free of excess joint compund. Some minor tool marks and visible edges are acceptable.
Level 3
Suitable for surfaces intended to have sprayed or hand-applied heavy or medium texture finishes and where heavy wall covering is the desirned final decoration. All joints and interior angles shall have tape embedded in the joint compound. Apply one spearate coat of joint compound over all joints and fastener heads. The joint compound shall be left with a smooth finish by scraping off nibs and ridges iwht the edge of a towel.
Level 4
Level 4 is the accepted level of finish for domestic construction. It is particularly useful where lighting shines on light textures, light wall coverings and smooth textured finishes. It is also used where smooth textured finishes and satil/flat/low sheen paints are illuminated by non-critical lighting. Flat paints in the situation help to conceal joints.
Carefully evaluated weight, texture, and sheen level of wall coverings. Conceal all joints adequately if wall covering material is lightweight, glossy, or light patterned, or any combination of these.
All joints and interior angles shall be taped and finished with three coats of jointing material. Ensure the joint compound is left smooth and free of tool marks and ridges.
Level 5
Is used where gloss or semi-gloss paints are specified and where critical lighting affects satin, flat, or low sheen paints. All joints and interior angles shall have tape embedded in the joint compound. Apply a minimum of two separate coats of joint compound over all joints, angles, fastener heads, and accessories. Ensure the joint compound is left smooth and free of tool marks and ridges.
Complete the work with proprietary surface preparations or, if required, skim coating to remove differential surface textures and porosity.
Note:
- Substrate framing shoul dbe carefully inspected before plastering commence to ensure that it is acceptable to the installer. Once the installer accepts the framing, he or she becomes fully responsible for the level of finish of the plasterboard surface.
- Residential Level 4 constructions with paint finish should not be subject to critical glancing light.
7.4 The level of finish and expectations should be clearly defined. As can be seen from the below we would normally have;
7.4.1 In a painted living room level 4 finishes MINIMUM, and in some selected cases level 5 are required subject to specification and acceptance of cost of this.
7.4.2 In fully tiled bathrooms, the finish is going to be around a minimum of level 3.
7.4.3 Bathrooms with a painted finish NORMALLY have a lot of lighting (the nature of bathrooms) to highlight defects BUT – as a small area, and with lights only pointing down - so level 4 minimum.
7.4.4 Level 5 costs more – simple as that – it involved spraying on a sandable skim coat – you put gyprock up, set joints etc, and then apply a skim over the entire wall and sand if back – essentially white setting the entire area with no plasterboard “paper” visible.
7.4.5 Up/down lighters crease glancing light and are TYPICAL areas for a very high level 4 – possibly level 5. Limit this form of lighting!
7.4.6 Stair walls being 5m high typically have a control joint and the level of finish in many cases needs to improve to level 5. Particularly where up/down lights/wall lights are used, or there is a large natural light window in the stair to cast light on the side wall with control joint built out defects highlighted.
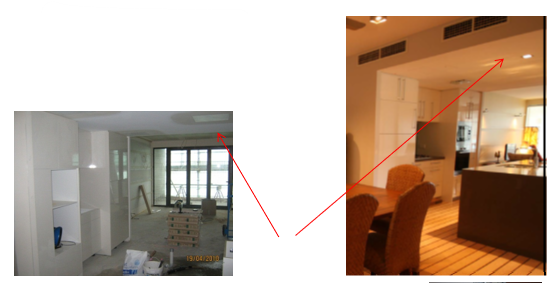
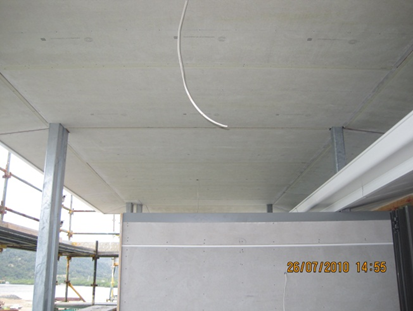
Below – FLUSH set access panels in a ceiling – the light source in this particular unit development which was located on a Marina – was the significant light cast off the water in the marina which highlighted the defects in the ceilings – and so a level 5 finish was applied.
7.4.7 Plasterboard & MDF will not be used on windows sills. Villaboard is acceptable where used with an external grade (wet areas) setting compound and painted in a semi-gloss or gloss finish.
7.4.8 Cornice attached to cement based materials will be adhered using wet method installation or cement based adhesives.
7.4.9 Corner and other setting angles or joiners will be PVC when the site is within
1000m of salt water or heavy industrial areas to avoid the inevitable rusting of steel setting angles.
Sheeting - Walls
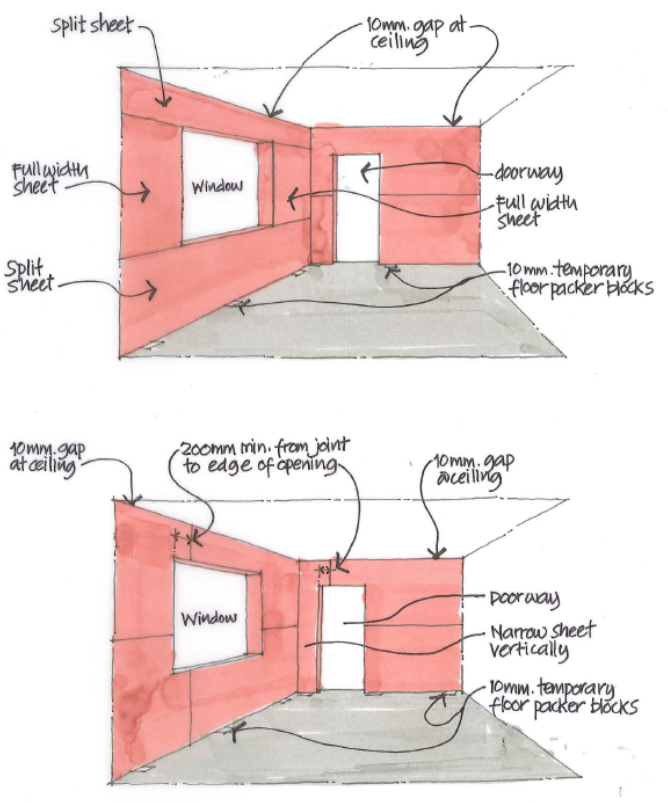
7.5 To achieve a good finish – it is imperative that the installation be completed to minimise the sheets and joins. Every set joint is a potential for an imperfect finish.
7.6 Sheet layout should be carefully planned with sheets set out to ensure best coverage and to minimise butt joints and wastage. MINIMISE SETTING.
7.7 Where possible, sheets should run across doors and windows and be cut out after fixing.
7.8 Full length sheets should be used where possible to eliminate the need for sheet end butt joins.
7.9 Stagger butt joints on adjoining sheets and with those on opposite sides of the wall.
7.10 Vertical joints should be kept to a minimum of 200mm from the edge of openings.
7.11 When the installer BREAKS a sheet – insist on the sheet being used elsewhere where it can be cut down – installing and setting over it is just delaying the inevitable rejection of finish. The earlier you pull this up, the less expensive it is to rectify.
7.12 Corner and other setting angles will be PVC in all external locations.
7.13 Avoid small patches – the lack of a recessed edge affects the setting build-out and the level of finish
7.14 Avoid vertical sheet layout installation - Horizontal fixing minimises the effects of glancing light and reduces jointing, provides a stronger wall and places joints at a convenient height for stopping and is the preferred sheet orientation for optimum finishing standard. Noggings are not required behind recessed joints in horizontal applications.
7.15 When installing sheets over cavity sliders door frames – it is important that the cavity sliders are delivered with frame spreading foam blocks and/or timber wedges and that they remain in place until the sheeting is installed and lining adhesives have set.
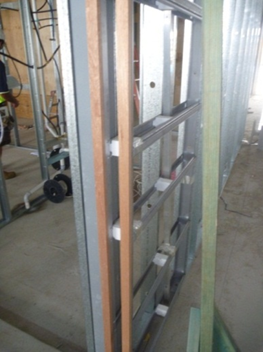
7.16 Failure to do so will result in the plasterboard being pushed against the frame and having the frame bowed in – reducing the available “cavity” which ultimately leads to rubbing of the doors against the frames on each side.
7.17 Ensure the installer uses SHORTER screws than usual to avoid the screws being long enough to scratch the cavity doors once installed.
7.18 These issues happens A LOT – so when you have cavity sliders it is a policy requirement that you control the installation of linings over these frames.
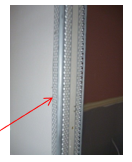
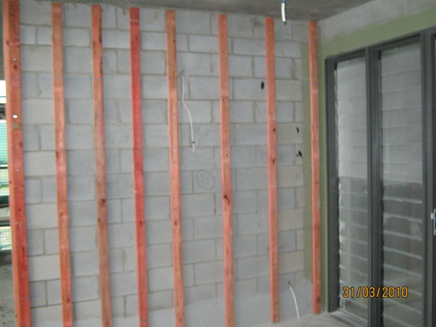
The below frames are NOT satisfactory and the bowed framing will not return to a properly aligned cavity pocket – these should be returned and NOT used .
Sheeting - Ceilings
7.19 Ceiling sheets should be installed with the long edge at right angles (perpendicular) to the direction of the support members.
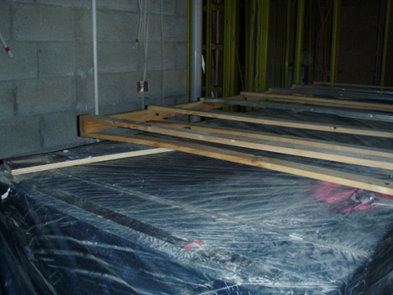
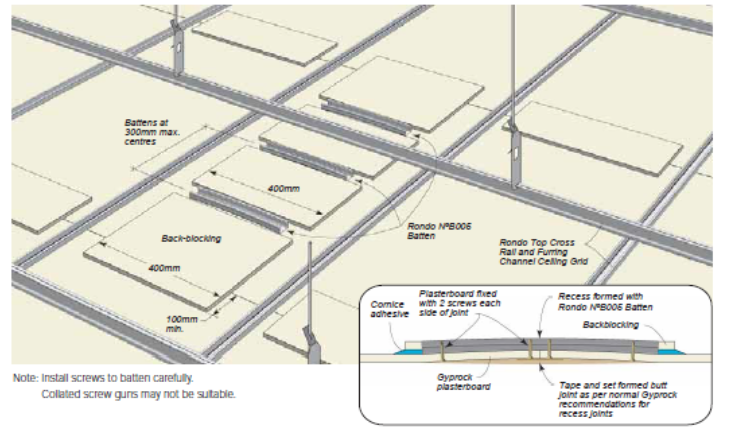
7.20 Where 4 or more sheets are consecutively installed in a run – they MUST be back blocked – see below.
Sheeting - External Soffits/Cladding
7.21 Counter sunk or self-bedding screws must not exceed 150mm centres and must be located at all glue points.
7.22 Pan Head screws must not exceed 300mm centres.
7.23 Framing must be strutted to in order to achieve the above or any other manufacturer’s detail.
7.24 Eaves must be sealed using a primer and undercoat or painted with acrylic semi-gloss paint.
7.25 External cladding will be supported, fixed, spaced to allow for expansion and set consistent with Manufacturers specifications which must be made available to all relevant trades and Hutchies Team members on site. Horizontal joins will be Z flashed unless otherwise approved by the manufacturer.
7.26 It is CRITICAL that set joints in soffits are protected by an INSULATED roof – or the condensation from the underside of the roofing will drip onto the soffit lining and destroy the set joints.
Above - Insulation at soffits

Above - FC soffits