A key aspect of precast works is the grouting as this performs one, multiple or all of the following functions;
• Structural (loadbearing)
• Fire resistance
• Weatherproofing
It’s important to determine which aspect you are trying to achieve and apply these to the detailing of the precast element.
Structural Capacity
The most important part is to have the engineer confirm the minimum width of grout required and compressive strength required to achieve the designed load transfer.
This means co-ordinating the design to be certain of achieving this or a redesigned width in consultation with the engineer.
There are some key factors in establishing exactly what is required;
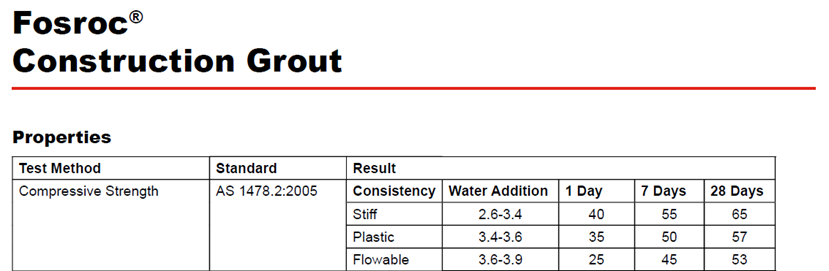
1. Proposed grout – every manufacturer is different – some list the compressive strengths based on a dry pack use of the grout, others based it on the flowable grout. Some manufacturers list all flowable, wet bed and drypack options because the amount of water added to the grout reduces the final compressive strength – see below published data on one leading manufacturer
(the importance of quality control and grout compressive strength sampling and testing will be covered later)
2. Proposed methodology - If the engineer wants 60 MPa grout and you propose using the wet bed method of install and want to use Fosroc, - it only achieves 57 MPa – and that’s assuming its mixed properly. You may need to select a different grout
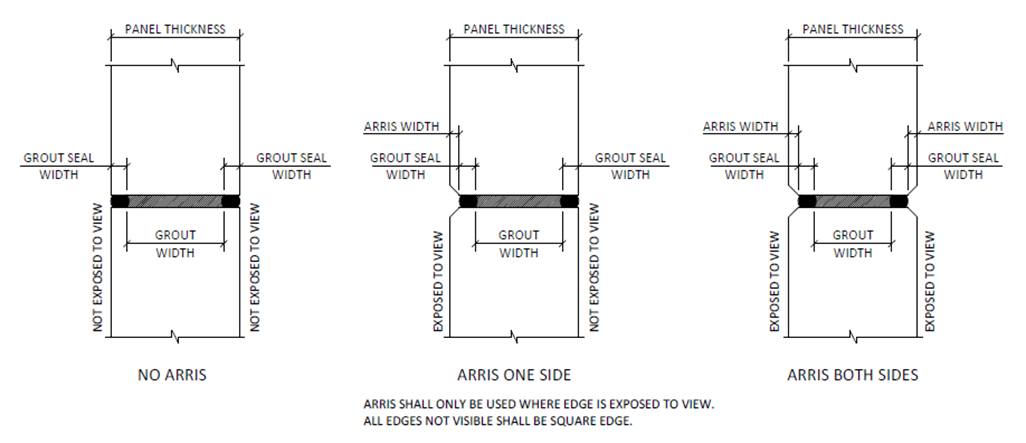
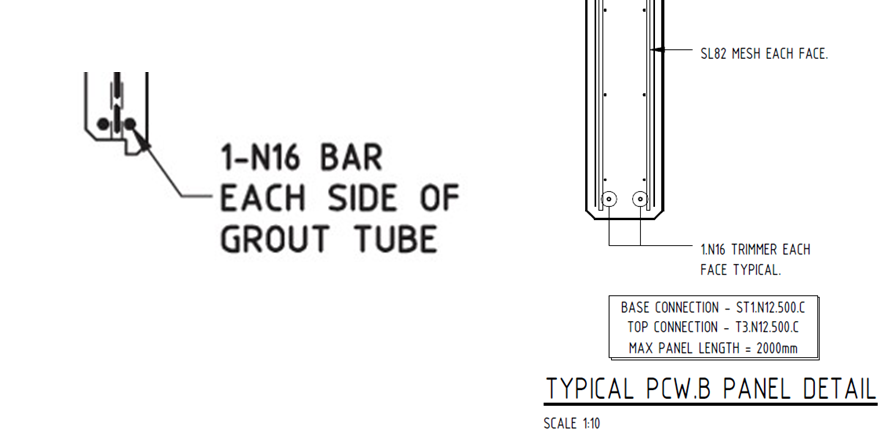
3. Design of the precast connection – if the panel is cast with fillets or a ship-lap detail - both of which reduce the available width of grout
For example – the use of fillets each side of precast panel reduces the panel width available for grouting considerably.
To put it in perspective, refer below engineered calculations on the need increased compressive strength of grout as width reduces – to reduce the available area over-stresses the grout so it needs to be a higher performance.
Note below is based on flowable grout which is the weakest form of grouting by ratio of water but it serves to provide guidance of the impact from loss of bearing width of grout
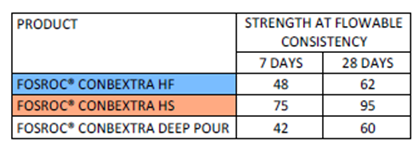
Appreciate that the significant reduction of available bearing capacity using a ship-lap detail requires detail consideration by the structural engineer based on the above
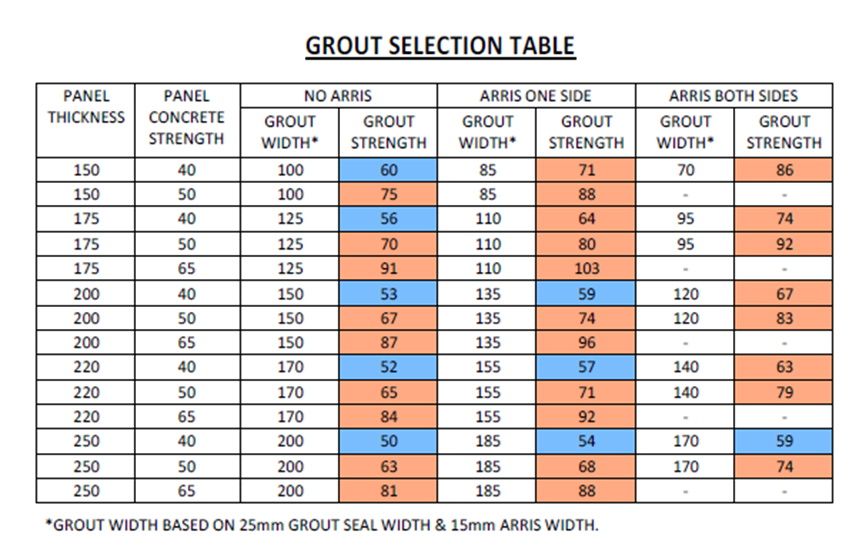
4. Selection of the grout based on the above table (for this product only in flowable form) is simply as below
- Review panel width and concrete strength, ariss size and grout seal width;
- Select grout strength from grout selection table;
- Alternative grouting products may be substituted to those specified in the table however the proposed grout must satisfy the specifications on this drawing and must be signed off by a registered engineer (RPEQ) stating that the proposed material is of equivalent specification to that specified on this drawing:
Note:- the project engineer may be able to reduce the required grout strength based on design stresses. Any changes are to be signed off by the project engineer, ensure project engineer is aware of ariss size and grout seal width being used.
To simplify this further given the almost infinite number of grouts, panel widths and details, building loads and various methodologies the process is;
• Review Architect and structural drawings and confirm details of fillets, width etc
• With detail agreed, have engineer confirm MPa requirement of grout
• Select grout based on methodology proposed
• Send to Engineer for approval
• Ensure the approved grout is used and mixed correctly
5. With the grout width determined and grout type and methodology selected – its important to have the engineer confirm the increased stresses based on the final width/load path are considered against the precast element design – that panel concrete strength and reinforcement design (edge trimmer bars to prevent bursting of panel due to overstressing from increased load transferred through the reduced grout width
Fire Resistance
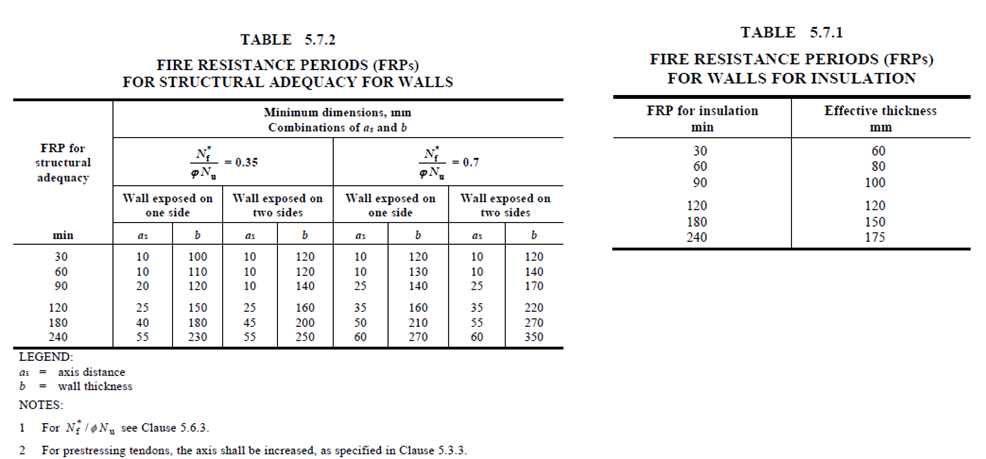
Non-shrink Cementitious grouts are considered equal to concrete for fire resistance so typically 120mm min width grout for 2 hours etc. Check your fire resistance level required (may be 3 hours between carpark and retail for example) and establish the minimum grout width required to achieve this with the engineer
This is covered is AS3600
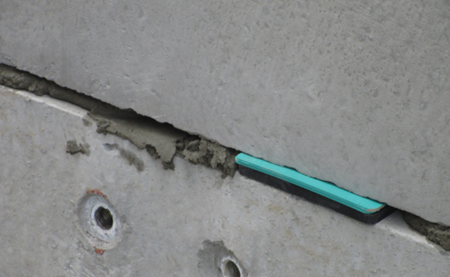
In terms of levelling shims, consider these do impede on the achievement of the minimum grout width for fire rating – the manufacturers recommend as below.
Levelling shims
If these are to be removed after the grout has hardened, they should be treated with a thin layeer of grease.
or maintain the width and trim the shim.

Weatherproofing
Non-shrink grouts when placed properly (well compacted) will afford good weather resistance, but as always a vertical waterstop if required as the ultimate backup to guide water away from the inside towards the outside of the building.
It’s important consider the placement of levelling shims to prevent creating a direct path from inside to out for weather resistance as well. As above see options